Friday night, during our normal Earthdawn session, I asked during a break, “Hey, would anyone be interested in a one-shot teaching session of Draw Steel?” The response from my players was immediate. I had four, possibly five, players interested in learning the game, and if they liked it, they were open to an every other Sunday game.
I had a map and an encounter in the works, and this just got me to hunker down and put in the work, last minute, of course, to put together something passable. Let’s step through how I worked out this training session for my players.
*Note: I don’t get a referral from any posted links. I use their products because they are the best tools for me.
Before the session
- I built the encounter. I knew I wanted it to be goblins and quite a few of them. I jumped to the Draw Steel Monsters book and did the math—time: 10 Minutes or so, after I read through the encounter building section a few times.
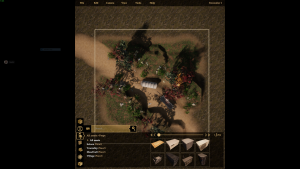
- I created a map with Chronos Builder and edited the exported maps with Affinity Publisher. I then made a second copy of the map and added placement of minions and terrain elevations for quick reference. I could have found one of the thousands of maps online that would have fitted the encounter, and would probably do so in the future, as this was a decently time-consuming activity for a quick teaching one-shot. Time: About an hour and a half total
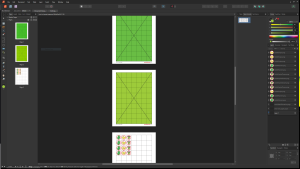
- I had printed out some 1 in square marked paper with different colors to indicate elevations in terrain. This seemed the easiest to me at the moment. I then cut out the terrain shapes from the 1” grid. I used this file and added color overlays in Affinity Publisher. Time: 10 Minutes
- Printed up the monster stat blocks from the Monsters book. I like having physical pages to reference. Time: <5 Minutes
- Printed up some tokens by placing images on the 1” grid paper in Affinity Publisher. Printing it, then cutting it out. As a quick note, square tokens are much easier to cut out than circle tokens. Time: About 10 minutes
- Built a quick scenario to get the players in the mood. Time: 5 minutes
- Built a montage test for after the encounter. Time: 10 minutes
- Printing up characters from MCDM’s Draw Steel resources page.
The total prep time for a custom map, tokens, elevation terrain, encounter building, scenario, and montage test is just about 2 hours. Using a downloaded battle map would have cut this down to about an hour. In my experience, this is really not bad for an encounter prep session.
I did this completely backwards from my typical workflow. Usually, I would start with the scenario and go from there. And this may be a hot take on the subject, but I don’t think there is a right or wrong way to build an encounter. It’s whatever works best for you in that moment. Now, I’m not including any of the reading I did for inspiration while I was thinking about what to do for the adventure. This includes extraordinary short adventures from the Dice Society and Champion Endeavors.
Let’s break all this prep work down more.
Building the Encounter
Let’s jump straight to pages 10-12 of the Monsters book since that is where all the goodness starts. Encounter building boils down to 5 steps:
- Think – this directly ties into your scenario. At the start, I wanted an ambush with goblins. Why? Well, that could come later.
- Choose Difficulty—This should be a Standard Encounter. I wanted the players to feel challenged but not overwhelmed the first time they played.
- Determine Encounter Strength—I would have 4 to 5 players, so I have to build for that. There is a quick table on page 11 of the Monsters book, or the math is pretty simple: 4 for each hero and 2 for each level of each hero. Basically, a first-level character is 6 points, so four first-level Characters would be 24, and five would be 30.
- Determine Encounter Budget – Encounter Strength for a Standard Encounter is the party’s encounter strength plus the party’s +1 Hero Encounter strength. So 24 – 30 for four characters and 30 – 36 for five characters. Since both have 30, let’s set that at the encounter strength for both possibilities.
- Spend Encounter Budget—here is where it gets a little more free-form. Let’s jump to the goblin section on page 160 and figure this out.
-
- Goblin Minions are easy at Encounter Value 3 for four minions of different varieties. They also add cool, easy-to-kill monsters that make your players feel heroic when they wipe an entire squad with one smashing blow. So let’s add four groups of minions: 2 Groups of Spinecleavers and two groups of Snipers, for an EV total of 12.
- Normal Gobbos are also easy at EV 3 for each. So let’s throw in a Stinker and 2 Warriors. Now, there isn’t a scenario in the wilderness where the lead goblin warrior shouldn’t have a Worg to ride on, so let’s add 1 of them for a new total encounter value of 24.
This is where I initially landed for the encounter. For more variety, you could throw in a Cursespitter or an Underboss if needed. Not me. I added the final piece right before the session started, and it really tied it all together. More on that later.
-
| Creature | EV |
| Spinecleaver Minion Group 1 | 3 |
| Spinecleaver Minion Group 2 | 3 |
| Sniper Minion Group 1 | 3 |
| Sniper Minion Group 2 | 3 |
| Stinker | 3 |
| Warrior | 3 |
| Warrior on Worg | 6 |
| Total | 24 |
Making the Maps
In Chronos Builder, this is a pretty straightforward process: define the size of the map, lay down a background layer, adjust terrain with a shaping tool, and drag and drop assets. They have a map builder tool, but I’ve never relied on it. The maps it makes are functional but lack a certain something that I can’t quite put my finger on.
Take this and export it in top-down view with 1” grids, and Wham! You’ve got yourself a map. In the end, I just used this map as a reference, and we played the game on a Hexers fold-up battle map board, with terrain elevation shown on cut-out 1” grid mark sheets of paper and a thin plastic overlay to keep things from moving. This worked out perfectly well.
Terrain Elevation Pieces
This is pretty straightforward. Get your 1” grid paper PDF. Draw a rectangle over the grid and color it. I chose a light green and a darker green. Set your layer to multiply, and now you have a colored grid. Print. Cut out shapes and repeat.
Print up Monster Stat Blocks
Click print, specify page range, and go.
Printing Tokens
I made some goblin faces in Affinity Designer—silly little things, really, but I liked them. I exported the goblin faces, threw them in Token Stamp, and made an appropriately sized token. I then placed these images on the 1” grid sheet in Affinity Publisher, copied them multiple times, and printed them. If I hadn’t made an image yet, I just placed a circle with a text block in a square to represent the monster or NPC.
Could you build a quick scenario already?
I should have done this step first, but when I built the encounter, I didn’t have a clear direction of what I was going to do with it. It was honestly an exercise in encounter building for me. I had a map I made when I built the encounter, and that was going to do.
I wanted it to be an Ambush, but why? That’s when it hit me: This isn’t going to be the start of an epic campaign; it’s a one-shot. Just give them the information, and let’s roll with it. After all, in Draw Steel, first-level characters have already been out there adventuring for a while, so it’s perfectly reasonable for them to already know each other and have made some contacts. Let’s work with that.
The heroes are on their way to meet a contact about a quest. Let’s call this contact Alden, who’s a merchant by trade. Traveling through the forest to the agreed upon meeting spot they come across Alden’s servant Jim bloodied and beaten telling them that Alden is being held by goblins just down the road. Of course, the Heroes rush to the aid of their friend, only to find that Alden is being held by a group of goblins by his now destroyed cart.
Now the last bit of the encounter fell into place. Jim was working for the goblins, luring the heroes into a deadly trap! So we add a Human Scoundrel to the encounter (EV 6) that will be behind the heroes as they start combat. Finally that searched for EV 30.
Building the Montage Test
After the encounter, we ran a quick montage test of escaping the now-amassing goblin horde bearing down on the Heroes’ position. It will be an escape-the-forest Montage test, let’s say six successes or failures in two rounds. They need to escape, so let’s just throw out some possible things they may have to solve.
- A fallen tree blocks their path.
- Goblins are searching for them.
- Wolves are closing in on their scent.
- Fires are lit around them, filling their path with smoke.
- The trees all look the same; you’ve lost your way.
- You must cross the ravine at the edge of the forest.
Wrapping up and running the game
We met at the FLGS, and I gave the players their character options and the reference sheets. They decided on the Dwarf Fury, the Human Tactician, the Human Censor, and the Polder Elementalist. I went over how Power Rolls worked, and we started the session.
Combat took two hours. About a third of that time was spent looking up rules that both I and the players needed clarification on. Then we ran the montage test, which took about half an hour. Overall, the players really enjoyed themselves, as did I.
If you’ve stuck with me this long, I applaud your stamina. Eventually, I will write this Training Adventure out into a more comprehensive adventure for you to run for your table. Until then, keep your blade sharp and be prepared to Draw Steel!